Microsoft Exchange Server
This topic provides details on how to capture Microsoft Exchange Server on-premises data via the VerQu on-premises collection application.
Requirements
Before using this data source, note the following license requirements, version support, and special considerations.
License requirements
- A valid Microsoft Exchange Server license
Versions supported
The following versions of Microsoft Exchange are supported:
- Exchange2007_SP1
- Exchange2010
- Exchange2010_SP1
- Exchange2010_SP2
- Exchange2013
- Exchange2013_SP1 and later
Considerations
Note the following considerations about this data source:
Email Collection
- By default, draft email messages are excluded
- Items deleted from the Deleted Items folder are captured by default
- Data in the folder Recoverable Items > Audit will be skipped since this folder contains system information only
It is recommended to have a retention policy set to at least 30 days for all users who are being monitored. Refer to the following guide from Microsoft to get started with retention policy, if you do not have one in place already: https://docs.microsoft.com/en-us/exchange/policy-and-compliance/policy-and-compliance?view=exchserver-2019
Information captured
This section lists what activities and, if applicable, metadata are captured when you use this data source.
Activities captured
The following table lists activities captured by this data source:
| Activity | Notes |
|---|---|
| Emails with attachments | |
| Calendar Appointments | |
| Calendar Meeting requests | |
| Calendar Meeting Cancellations | |
| Skype Conversations | Skype Conversations are pulled from the Conversation History folder |
Activities not captured
The following table lists activities not captured by this data source:
| Activity not captured | Notes |
|---|---|
Setup instructions
This section provides details on the prerequisites and steps for setting up this data source.
Prerequisites
You must have the following in order to complete the setup instructions for this data source.
Company specific prerequisites
You must provide an Exchange Service Account user with the following permissions:
- ApplicationImpersonation Role
- Be ready to enter the email address and password for Exchange Service Account
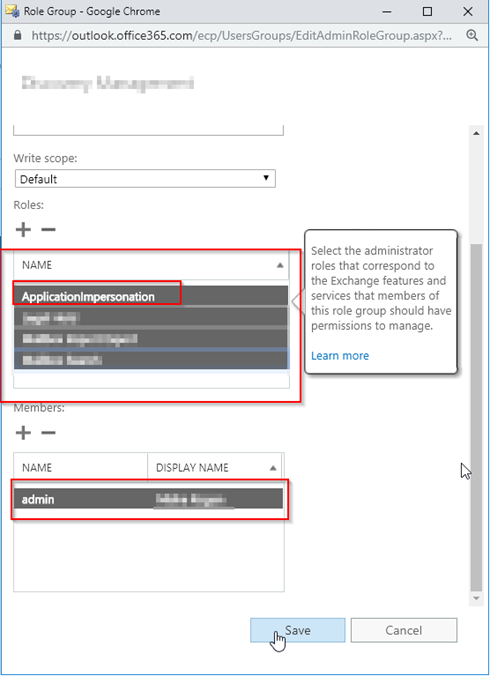
To configure an Exchange Service Account, follow the steps below:
- Navigate to the admin section for your Exchange server (Exchange under Admin Center)
- Navigate to Permissions > Admin Roles
- Select an Existing Admin Role OR Create a new one. Edit the Role as follows:
- Roles must include ApplicationImpersonation
- Members must include Exchange Service Account that will be used to pull Exchange data
Setup in Trace
The following sections provide the steps for installing the VerQu On-Premises Application to collect the data locally, how to use a data transfer method for moving data to RelativityOne, and how to configure the data source in Relativity Trace.
VerQu On-Premises Application for Data Collection
- Navigate to the Using VerQu and install, configure, and schedule VerQu.
Some data source specific configuration is required while following the Using VerQu steps. That configuration can be found below.
- Locate the MicrosoftExchangeServer-Calendar.json and MicrosoftExchangeServer-Mail.json files
-
Use the screenshots and table below as a guide to update the values within those files.
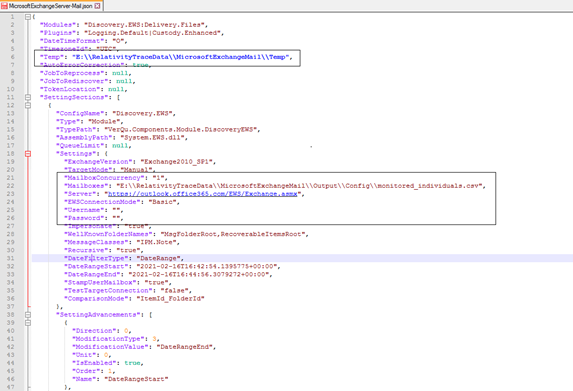

Setting Notes Temp Folder path where temporary data might be placed Mailboxes Path to Trace Shipper’s monitored_individuals.csv file.
Refer to TODO to understand what timestamp will be used for the data for newly added monitored individualsServer Specify the exact URL used when connecting to exchange server. Username Specify login to admin account on exchange server Password Specify password to admin account on exchange server Logname A local file path where the log files for the application should be stored. Log path should always end with “verqu-{datetime}.log” Destination The locally accessible path of the folder that needs to ship files from the Exchange server (note that the user running the service must have access) DataRangeStart / DataRangeEnd This contains information on the start date of the first run ConnectionString This a standard SQL Server connection string that support all possible ways of connecting to SQL Server, including Windows Authentication and SQL Server Authentication - Save the .json configuration files and navigate back to the Using VerQu documentation to complete the steps to configure VerQu.
Data Transfer
Shipper will be used to transfer on-premises data collected by the VerQu application to Relativity Trace in the cloud.
Data Source
Use the “Setting Up Data Sources in Relativity” section of the Shipper documentation to configure the Data Source.